Showing posts with label Mains. Show all posts

Thursday, 16 May 2013

Corned Beef Hash Pie


The recent sunny spell didn't last very long, so Rachel and I found ourselves having to get our coats back out and craving warming comforting food again...We've got an expensive few months coming up with our wedding and buying a flat so are trying to keep all other expenditure to a minimum. That unfortunately includes my food shopping so this recipe was perfect - warming and cheaper than chips!

Corned beef hash used to be a common dinner when i was a child but we haven't seen much of it for a couple of decades. Now like other fashionable things from the 80's (neon, converse trainers, shoulder pads, high waist shorts...)  it is making a bit of a comeback, albeit with what we'd consider an improved twist.

So this is what i've tried to do, take something great from the 80's and refine it with the knowledge and experience that hindsight and over two decades has provided us with.


Ingredients for 6-8 servings - 

Can of corned beef - 340g
Onion large, finely chopped
Red pepper, finely chopped
Garlic 2 cloves, finely chopped
3 tbsp Worcestershire sauce
2 tbsp sherry
Tbsp dried thyme
2 tbsp tomato puree
Approx 350ml beef stock

Salt and pepper

1-1.25kg of maris piper potatoes, roughly chopped, skin on
Butter
2 tbsp english mustard

Large free range eggs

  • Fry onion and garlic in oil in a pan for a few minutes until soft.
  • Add thyme and red pepper and continue to fry.
  • Add corned beef and fry for a few minutes, breaking up the meat.
  • Splash in sherry and worcestershire sauce, fry for 2 mins.
  • Add tomato puree and stock to the pan, boil for around 10 minutes to reduce slightly.
  • Add salt and pepper to taste and then transfer to a baking dish.
  • Chop the potatoes, leaving skin on (this adds another texture and speeds things up!) until soft then mash.
  • Add mustard, butter and a little milk and mash until smooth.
  • Top the meat with mash like a shepherds pie and bake at 200c for 25 mins until browned and crispy on top.
  • Serve each portion with a runny yolk, fried egg on top.

Sunday, 6 January 2013

Italian Slow Roasted Lamb Shoulder


Over Christmas, Rachel and I had the opportunity and pleasure to eat at Richmond's best restaurant for a second time. Al Boccon Di Vino is a small, traditional Venetian restaurant run and owned by Riccardo, a flamboyant and gifted chef. 

Riccardo

There is no menu, just whatever Riccardo decides to serve on any given day. The very best seasonal produce prepared using the expertise passed through generations of his family and the passion for gorgeous food running through his veins.  


There may be no menu but there is certainly no lack of food, the courses keep coming all evening - charcuterie, smoked cheese, prawns, scallops, salad, ravioli, risotto, carpaccio, lasagna, fish and more, all beautifully prepared and washed down with good Italian wine. Then the organised chaos of the kitchen quietens and gasps of shock and surprised desire spread around the room followed by warm applause, here comes the pinnacle of the savoury dishes - a deliciously slow cooked lamb, straight from the oven and paraded through the restaurant.

Customers that have already had their fill five times over are caught up in the atmosphere created by the theatrical culinary performance starring Riccardo and ably supported by his staff, again brought to a state of desire to eat even more delicious food!
 
The lamb is beautifully cooked and beautiful in it's simplicity. No fancy sauces or spices. Just great quality meat, cooked to perfection, enhanced with a couple of flavours - in this case garlic and rosemary, a classic combination, with some simple potatoes on the side. And there was still the deserts to come...


I cannot recommend Al Boccon Da Vino (translation - 'A Devine Mouthful') enough, for days after memories of mouthfuls of wonderful tastes come flashing back from the many different courses throughout the 4 hour banquet. If i were to try, i would struggle to real off everything we were served, such was the generosity of the event made more hazy by a good helping of the house wine.

I managed to ask Riccardo how he prepared the lamb and he responded 'Italian food is simple, just great ingredients, the lamb - 5 hours with olive oil, garlic and rosemary' - perfect. 

So a few days later when my stomach had flattened slightly I decided to give it a go. Rachel suggested we should roast some sweet potatoes as well as normal potatoes and this added a great sweet addition to the final dish. The next day we had the leftovers with a simple feta, rocket and tomato salad which also went well but is really not necessary, the lamb and potatoes alone are so full of flavour and splendidly moist.


Ingredients, serves 4 to 6 -

Approx 1.75kg lamb shoulder
Whole bulb of garlic
4 rosemary stems
Good quality olive oil

3 medium sized potatoes
3 sweet potatoes
(Both unpeeled and chopped into large pieces, around 1 inch thick)

  • Preheat oven to full temperature.
  • Rub olive oil into the meat, season both sides generously with salt and pepper.
  • Slice into the fatty side of the meat with a knife.
  • Smash the garlic bulbs and add half to the bottom of a high sided baking tin with half the rosemary.
  • Place the meat on top.
  • Add the rest of the garlic and rosemary to the top of the meat, tucking into the scored fat.
  • Tightly cover with foil.
  • Place in the oven and immediately turn down to 160c/150c (fan).
  • Cook for 3 and a half hours.
  • Add chopped potatoes to the baking tin, stir to coat in the lamb juices and thick sticky garlicky deliciousness which has developed in the roasting tin. Take the opportunity to baste the lamb too.
  • Recover and cook for a further hour.
  • Remove the lamb and allow to rest, covered in foil. 
  • Spread the potatoes out, turn the oven up to 210c and return to the oven, uncovered to crisp up, approx 20 mins.
  • Just before the potatoes are done pull the lamb from the bone using a fork. 
  • Serve the crisp potatoes and sweet potatoes with a generous portion of lamb.
 

Tuesday, 23 October 2012

Teriyaki Seared Tuna


Another quick to prepare Asian meal to keep you away from the local Chinese takeaway and their secret, hidden kitchens. What goes on behind the stud partition walls that they don't want you to see... Perhaps it is something as sinister as what occurred recently at a Chinese restaurant in Kentucky where the owners were caught wheeling a bin full of road kill into the kitchen... Do you want to take the chance that your beef in black bean sauce is actually made from half a squashed badger or that the chicken in your chow mein is really bits of pigeon pulled from the hub caps of a Vauxhall Astra?

All other fast food shops proudly display their produce unashamed of what they are selling, even the kebab dens proudly advertise the food with vague references to the meat included in the meals and display the skewered lamb and chicken in front of you to allow full examination before committing to a purchase

So, the next time you crave an Asian infused dish spend your hard earned on a lovely piece of fresh tuna instead of the mystery box from the local take away and smother it in this simple teriyaki sauce for a delicious Japanese flavoured dinner with all of the taste but none of the worry.

That is if you still have an appetite at all after reading this post....


Ingredients for 2 portions -

approx 350g tuna steak
2 tbsp olive oil
salt and pepper
2 chillies chopped
3 tbsp dark soy sauce
4 tbsp honey

2 tbsp Sesame oil
1cm piece of ginger, finely chopped
3 pak choi
2 hand fulls of mushrooms

Optional sesame seeds to serve

Udon Noodles, approx 100g 

  • Mix the chillies, soy and honey until well combined
  • Cook noodles according to packet instructions
  • Add sesame oil to hot wok with a little finely chopped ginger, cook for a minute and then add the chopped pak choi and chopped mushrooms
  • Rub tuna all over with oil and season with salt and pepper
  • Heat a griddle pan until very hot, add tuna steak and sear for approx 3 mins on either side until browned.
  • Pour over the honey/soy mix and allow to cook and caramelise for up to a minute

Serve in a bowl, noodles at the bottom, veg around the edge and the tuna on top, drizzle with the remaining sauce from the griddle pan.
 
Sprinkle with sesame seeds

Tuesday, 11 September 2012

Pan Fried Pigeon Breast with Black Pudding


As the wood pigeon season comes around again this September why not nip to your local farmers market and pick up something new with which to dazzle your taste buds?

Try this great and easy recipe to broaden your horizons or impress a dinner date. You can prepare and cook everything in less than half an hour.

Afterwards you will never look at a pigeon the same way again, well maybe the skinny ratty kind that every town centre in the country is infested with...

But the next time you see one of the big fat wood pigeons waddling around your garden you will have to physically stop yourself from charging outside and doing your best Dastardly and Muttley impression to catch him and have him for supper!

Now find out where and when your nearest farmers market is on and go and buy some. Get out there and buy the pigeon, buy the pigeon, buy that pigeon now!!


Ingredients, for 2 servings-


4 Pigeon (or Partridge) Breasts
2 Slices of Black Pudding
125ml Beef Stock
25ml Red Wine
Heaped Tsp Berry Jam, whatever you have in i used lingonberries.

To Serve
Potato Rostis
Sauteed Green Veg - Leeks / Broccoli 


  • Season the breasts with salt and pepper.
  • Heat a frying pan until hot and then fry each breast for 2 minutes on one side and then turn and fry for another 2 minutes on the other side.
  • Remove from the pan and allow to rest, while keeping warm.
  • Deglaze the pan with the red wine and then add the stock and stir through the jam.
  • Reduce the liquid by half.
  • Meanwhile fry or grill the black pudding until crisp and hot. 

Serve a slice of black pudding with a couple of pigeon breasts on top, drizzled with the red wine jus and some potato and vegetable sides.

Thursday, 16 August 2012

Pulled Jerk Pork with Mango Salsa


Rachel and I absolutely LOVE chillis and our favourite type is the gradually increasing heat provided by the super spicy, Caribbean scotch bonnet pepper, especially when it is used to make a lovely jerk marinade.

Tucking into a generous portion of irresistible jerked meat leaves us both sucking in air to cool the fire building in our mouths, but it is just too good we cannot stop.... Even when we're bloated, sweaty, crying messes, rolling around the floor in a hazy mixture of pleasure and intolerable pain we will still rub one last finger through the remaining fiery sauce left on the plate, incapable in our delirious state of making the sensible and necessary decision to simply stop eating....

If you are a chilli lover too you're probably getting excited reading this as our spicy little friends are addictive in the same way as drugs. People crave the release of endorphins caused by eating chili in the same way as speed was craved by 1950s American housewives or Meow Meow is by the young revellers of today. And like all addicts the fix to truly satisfy your itch needs to be stronger and stronger the longer you have been trapped by your own particular vice. Anything too weak will leave you feeling dissatisfied and angry. This is why this recipe is so good, even for the most ardent chili addict the scotch bonnet jerk paste seasoning will give you the hit you're craving and the addition of the jalapeno and mango salsa will top it off and leave you sinking into the drooling ecstatic state that you dream of.

The jerk paste can be used to marinate anything you like, for a quicker meal use chicken or go veggie with peppers and onions. Serve your delicious spicy jerk meat with a refreshing salad, the sweet mango salsa and a good dollop of cooling soured cream.


For the Jerk Paste:

Ingredients -

2 - 3 Scotch Bonnet Chilis, deseeded and chopped
3 Tsp All Spice
2 Bundles of Spring Onions
2 Tbsp Fresh Chopped Thyme
Tsp Cinammon
Tsp Nutmeg
Approx 1 and half inch piece of Ginger, peeled and chopped
7 Garlic Cloves
2 Tbsp Dark Soy Sauce
  • To make the paste put all the above ingredients into a mini blender and blend until smooth.
  • Unused paste can be refrigerated for a couple of weeks 

For the Pulled Jerk Pork:

Ingredients -

Approx 750g Pork Shoulder Steaks
Splash of Water
Jerk paste from above (or bought paste) 
BBQ Sauce
  • Rub a generous amount of the jerk paste over the pork and leave to marinate for a few hours
  • Preheat your oven to 150c
  • Place the marinated meat in a casserole dish, add a splash of water
  • Cook in the oven with lid on for approx 3 hours, take the lid off for the last 30 mins
  • Skim the fat off the top towards the end
  • Remove the dish from the oven and shred the pork with a couple of forks, allow to cool a little before doing this
  • Add a tbsp or 2 of your favourite bbq sauce and stir
  • Turn the oven up to 190c and cook for approx another 30 mins to reduce and crisp up a bit.


For the Mango Salsa:

Ingredients -

1 Mango, peeled and diced
1/2 peeled and diced Cucumber
2 Tbsp finely chopped Jalapenos
1/2 Large Red Onion, diced
Good squeeze of Lime Juice
Handful of roughly chopped Coriander
Salt and Pepper
  • Combine all the ingredients above in a bowl
  • Squeeze over the lime juice
  • Top with the coriander
  • Season with salt and pepper
  • Toss everything to combine

Tuesday, 26 June 2012

Thin Sushi Salmon Rolls with Pickled Cucumber


Thin Sushi Salmon Rolls - A First Attempt!
At the start of the year Rachel and I decided to write a list of a few of the things we wanted to accomplish or experience during the 12 coming months. This ended up growing into a 32 point bucket list containing such exotic activities as 'visiting South America', quite simple things like 'cooking a Beef Wellington', rather obscure aims 'speaking Spanish around the flat on Thursdays' and the incredibly brave 'going on a jog together'...

No.23 on the list was to 'make Robin like sushi'. There aren't many foods i don't like, bar perhaps some offal and horseradish sauce and dont get me wrong i don't hate sushi, but raw fish was nowhere near the top of my favourite meal list. I'd never go out of my way or spend my hard earned money to enjoy some.
 
So since January we have been thinking of where to go to try some great sushi but had not got around to it yet. Then an opportunity arose to attend a sushi making evening class and we decided this was perfect, we could learn the basics and then take control of the ingredients tailoring sushi at home to my tastes.

The night was great, interesting and fun in equal measures, and i enjoyed lots and lots of sushi as well as some delicious sides to compliment the obligatory soy dipping dish. In the end I may have sickened myself of the taste slightly, but once the sushi overload is long forgotten I'm pretty sure I'm going to crave a plate of neatly rolled rice and raw fish and may even make a special trip to get some on pay day!

The below shows how to make the sushi rice, assemble simple sushi rolls and prepare a delicious side of pickled cucumber:


Make the Pickled Cucumber Side Dish-

Ingredients -

A whole cucumber, sliced as thinly as you can
2 Tsp of Salt
4 Tbsp White Vinegar
1 Tbsp Sugar
  • Combine the salt and cucumber slices in a small bowl and leave to stand for approx 5 mins  
  • Mix sugar and vinegar in a bowl and set aside
  • Rinse the cucumber in cold water to remove the salt
  • Add the cucumber to the sugar and vinegar mixture and chill for up to a few hours or overnight.


Prepare the Sushi Rice - 

Ingredients -  
 
375g Sushi Rice
375ml Water
2 Tbsp Mirin

2 Tbsp Rice Vinegar
1 Tbsp Sugar
1/2 Tsp Salt
  • Rinse the rice then add a little water and allow to stand for 15 minutes
  • Add the rice, water and mirin to a medium saucepan, bring to the boil for a minute or two and then turn the heat down and cover for approx 20 minutes, until cooked through and soaked up all the water
  • Allow to stand, covered, for 10 minutes then transfer to a non metallic bowl to cool
  • When ready to make your sushi add the vinegar, sugar and salt to a saucepan and heat gently, stir until the sugar has dissolved
  • Pour the mixture over the rice and stir
  • Sushi rice is best used when it is lukewarm, it loses its stickiness when it is cold.
The above will make enough rice for 40 - 50 pieces of sushi.

Leftover rice can be used to make some quick Nigiri Sushi - Simply roll a small amount into a ball and top with your choice of fish, you can tie it together with a thin strip of Nori (toasted seaweed)


Assemble the Sushi -

Ingredients - 

Approx half of the cooked rice above to make 24 pieces
1 Portion of Tezu Vinegar Water
- 250ml Water, 2 Tbsp Rice Vinegar, Tsp Salt, mixed together.
2 Sheets of Nori (7x8 inches)
Wasabi Paste, quantity to taste
Approx 150g of best quality Salmon Fillet, cut into long strips
Sushi Mat
Sushi rolling mat
Avocado and Yellow Pepper, a few thin slices of each


  • Cut the Nori sheets in half so you have 4 measuring 4 x 7 inches
  • Cover the rolling mat with a piece of cling film so that both sides are covered, fold over at the sides so that it's nice and secure
  • Place a Nori sheet on the mat shiny side down, about an inch from the edge of the mat closest to you and with even space at either side
  • Wet your hands in the bowl of Tezu to avoid the rice from sticking
  • Place a handful of the sushi rice onto the nori sheet and spread evenly across the whole sheet leaving 3/4 inch strip along the top edge rice free
  • Take a small amount of wasabi paste on a finger tip and spread across the middle of the rice
  • Place a salmon strip, a piece of avocado and a piece of pepper together in the centre of the rice and repeat again so that your ingredients are spread across the rice
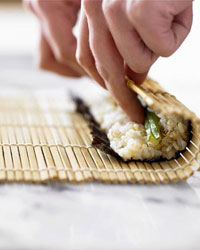
  • Place your finger tips over the ingredients and then use your thumbs to lift the edge of the rolling mat nearest to you over the filling, forming it into a roll
  • Lift the top of the rolling mat and turn the roll a little to overlap the edges of the nori and seal the roll, the edges will seal themselves
  • Roll the entire thing again to make sure it is even and tight and will remain sealed, this will take a little practice but they still taste great even if they don't look that neat at first!
  • Remove from the rolling mat and place in the fridge for approx 30 minutes to chill, then using a very sharp knife cut in half and then each half into 3, repeat with the remaining ingredients.
Serve with soy sauce to dip and pickled cucumbers on the side.

Tuesday, 15 May 2012

Moroccan Couscous And Smoked Mackerel Salad


Having never been totally convinced, we're still experimenting with dishes that combine sweet and savoury. We recently tasted a cheese macaron and although i found it rather pleasant, although equally confusing, Rach did not take to the clash of differing flavours occurring in her mouth ->

So it was with a little trepidation that i decided to take my life into my culinary hands and dish up a healthy Moroccan couscous style salad for dinner with Rachel's favourite broccoli included (hopefully this would help appease the beast) along with some potentially controversial and very sweet dried apricot also included.

The gamble luckily paid off, the mixture of the oily fish, sweet apricot, buttery couscous and fresh veg was splendid and has now been added to Rachel's weekly 'why dont we have ....... for tea tonight' request list, the seal of approval for any new dish!!


Ingredients (Serves 4) -

300g Couscous
2 tsp Ras El Hanout
Tsp Ground Coriander
Approx 1 tsp of grated ginger
2-3 Knobs of Butter
450ml Vegetable Stock

Approx 250g Broccoli, boiled until soft then chopped
Juice and Zest of half a Lemon
2 Cloves Garlic, finely chopped
Red Chili, finely chopped
1 Small Red Onion, finely chopped
100g Dried Apricots finely chopped

Toppings -
250g Hot Peppered Smoked Mackerel, flaked
100g Flaked Almonds, toasted in a dry pan until golden

  • Mix the couscous with the grated ginger, Ras el hanout and the ground coriander. Dot with butter and pour over the hot stock, cover tightly and leave for 10 minutes or until all soaked in.
  • Mix the couscous through with the broccoli, lemon, garlic, chili, onion and apricots until combined.
  • Top with the mackerel and almonds and serve.

Thursday, 26 April 2012

Rancheros Pie

This 'Southern Style' shepherds pie is the very first dish i made in a slow cooker.

Because it was a new experience, a first, it lasts long and fondly in my memory, just like your first kiss.

Every time i make it it takes me back to a time before this particular pleasure was something i'd experienced and i wonder how life was ever interesting or acceptable without it?  


I'd obviously heard of slow cookers but being a very impatient person, my advent calendars have always been finished by the 3rd of December, i had never had a desire to use one - until Rachel and I moved in together and Rach, it transpired, came with a slow cooker and very attached to it she was too!

As she came with quite a small quantity of household items, the slow cooker, a couple of mugs and what looks like a snake charmers basket which is apparently used to keep tortillas warm, i felt that i should embrace these gifts she was bringing into our new home and decided to give it a go. 

My initial apprehensions, that i would be left starving while waiting 8 hours for my dinner to slowly become edible before my eyes were unfounded. I discovered that the slow cooker does not stop snacking or sandwich making in the mean time and the results of the dish it produces are often incredible for the simplicity of the techniques applied. The smells that it produces are possibly worth the purchase price alone, put away your jasmine scented candles and rely on this to fill your home with the relaxing aromas of slow cooked minced beef.

In all honesty and looking objectively at the Rancheros Pie it isn't the greatest dish of all time, a little like your first kiss will not have been the greatest kiss of all time, they're both a little messy, the basics are there but something just isn't quite right. The memory, however, of the life changing moment, the key point in your life when everything would change forever means this dish will always hold a special place in our heart and is fully deserving of a place on this blog!

Ingredients, to serve 4 -

500g Minced Beef
1 Onion, finely chopped
2 Garlic Cloves
Tsp Cumin
1/2 Tsp crushed dried red chillis
1/4 tsp ground all spice
2 stems of oregano, roughly chopped
3 tbsps sultanas
400g can chopped toatoes
250ml beef stock
Salt and Pepper

Topping -
500g Sweet potatoes, thinly sliced
25g butter
Extra dried chilli flakes

  • Add the beef and onion to a pan and fry until browned.
  • Stir in garlic, spices, oregano, sultanas, tomatoes and stock.
  • Bring to the boil and add a little salt and pepper to taste.
  • Spoon into a pre heated slow cooker and cover with overlapping slices of sweet potato, dot with butter and sprinkle with chilli flakes and a little black pepper.
  • Cover with lid and cook on low for 7-8 hours, remove the lid and turn up to high for the last hour or so if the sauce is looking too watery.
  • Brown and crisp under the grill (optional) before serving .

Thursday, 19 April 2012

Jambalaya

When Rach and I have a child at some point in the future I'd be very tempted to call it Jambalaya, little Jambalaya Foster, Jumbo for short (let's hope it's not a girl).

My reasoning goes beyond the fact that it's a nice word to say or that i crave to repeat the tortuous school ground memories i personally have from being given my own unusual name.   

'Jambalaya' appears to come from a word which translates to a mish mash or mix up, a description of how the Spanish culture affected the local cuisine on the Caribbean Islands, where the dish was born. 

Our families have been similarly influenced, British mixed with Mexican and Polish nationalities to create us. So if a couple already from a mixed cultural background were to have a child it would be a real mix or mish mash of different cultures, a right little jambalaya if you will!


Ingredients -
 
150g chorizo, halved length ways and then sliced
3 hand fulls of leftover roast chicken torn into small pieces / 2 chicken breasts
2 medium onions, chopped
2 red peppers, chopped
4 garlic cloves, crushed
2 tbsp Cajun spice
2 tsp cayenne
440ml can of chopped tomatoes
750ml chicken stock
300g long grain rice

Grated Cheddar Cheese (Optional)
Hot chili sauce to serve

  • Fry the chorizo in a large pan until it starts to release it's oils, then add the chopped onions and cook until they're softened
  • Add the chopped pepper, garlic and left over chicken (if using chicken breasts then fry these beforehand on either side until done and then chop)
  • Add the Cajun and cayenne spices and stir through
  • Add the uncooked rice then pour over the chopped tomatoes and chicken stock
  • Cover the pot and allow to simmer for approx 20 minutes, until the rice is cooked. 
  • Stir the mixture occasionally to stop it from sticking and add a little more water if it's getting too dry and the rice is not tender. 
Serve drizzled with hot chili / Tabasco sauce to taste or if you want to make it a little less healthy grate cheddar cheese over the top and grill to melt.

Saturday, 7 April 2012

The Foster Family Chicken Parmesan

Passed down through at least 2 generations of the Foster Family (probably only 2 bearing in mind the cooking equipment used...) this is my all time favourite.  

My mum would cook it for me when i came home from Uni, on special occasions and probably any time she thought i needed cheering up. It was passed to my mother from my father's mother who was the most lovely woman with a perfectly groomed white Marge Simpson esque barnet, see photo attached of Nana looking very glamorous holding the most beautiful baby (me!).

The microwave technique works perfectly with this dish, keeping the chicken nice and moist and meaning that you can have a lovely filling hearty dinner in no time.

Ingredients -
Approx 600g Chicken Breasts, chopped each breast into approx 3 thin pieces
1 Large Egg
60g fine dry bread crumbs
30g finely grated Parmesan
2 x 400g cans of good quality chopped tomatoes
2 tbsp plain flour
1 and a half tsp Garlic Salt
2 tsp Oregano
300ml chicken stock
75g grated mature cheddar and another 30g grated Parmesan (or try some mozzarella)
Olive Oil

  • Mix breadcrumbs and Parmesan together, beat the egg in a separate bowl, dip the chicken first in egg and then breadcrumbs until well coated.
  • Quickly brown the chicken on both sides in a generous amount of oil in a frying pan and then place the pieces into a large microwavable dish.
  • Mix the flour, in a large bowl, with a small amount of tomato juice. Add the rest of the tomatoes, oregano, garlic salt and stock.
  • Heat in the microwave for 3 minutes on full power, then remove and blend until smooth, check the seasoning.
  • Spoon the tomato sauce over the chicken and sprinkle the top with grated cheddar.
  • Heat loosely covered with greaseproof paper on full power for 7-10 minutes
  • sprinkle with grated Parmesan and heat uncovered for another minute to melt the cheese
Serve with fried potatoes and veg or over pasta.

Tuesday, 3 April 2012

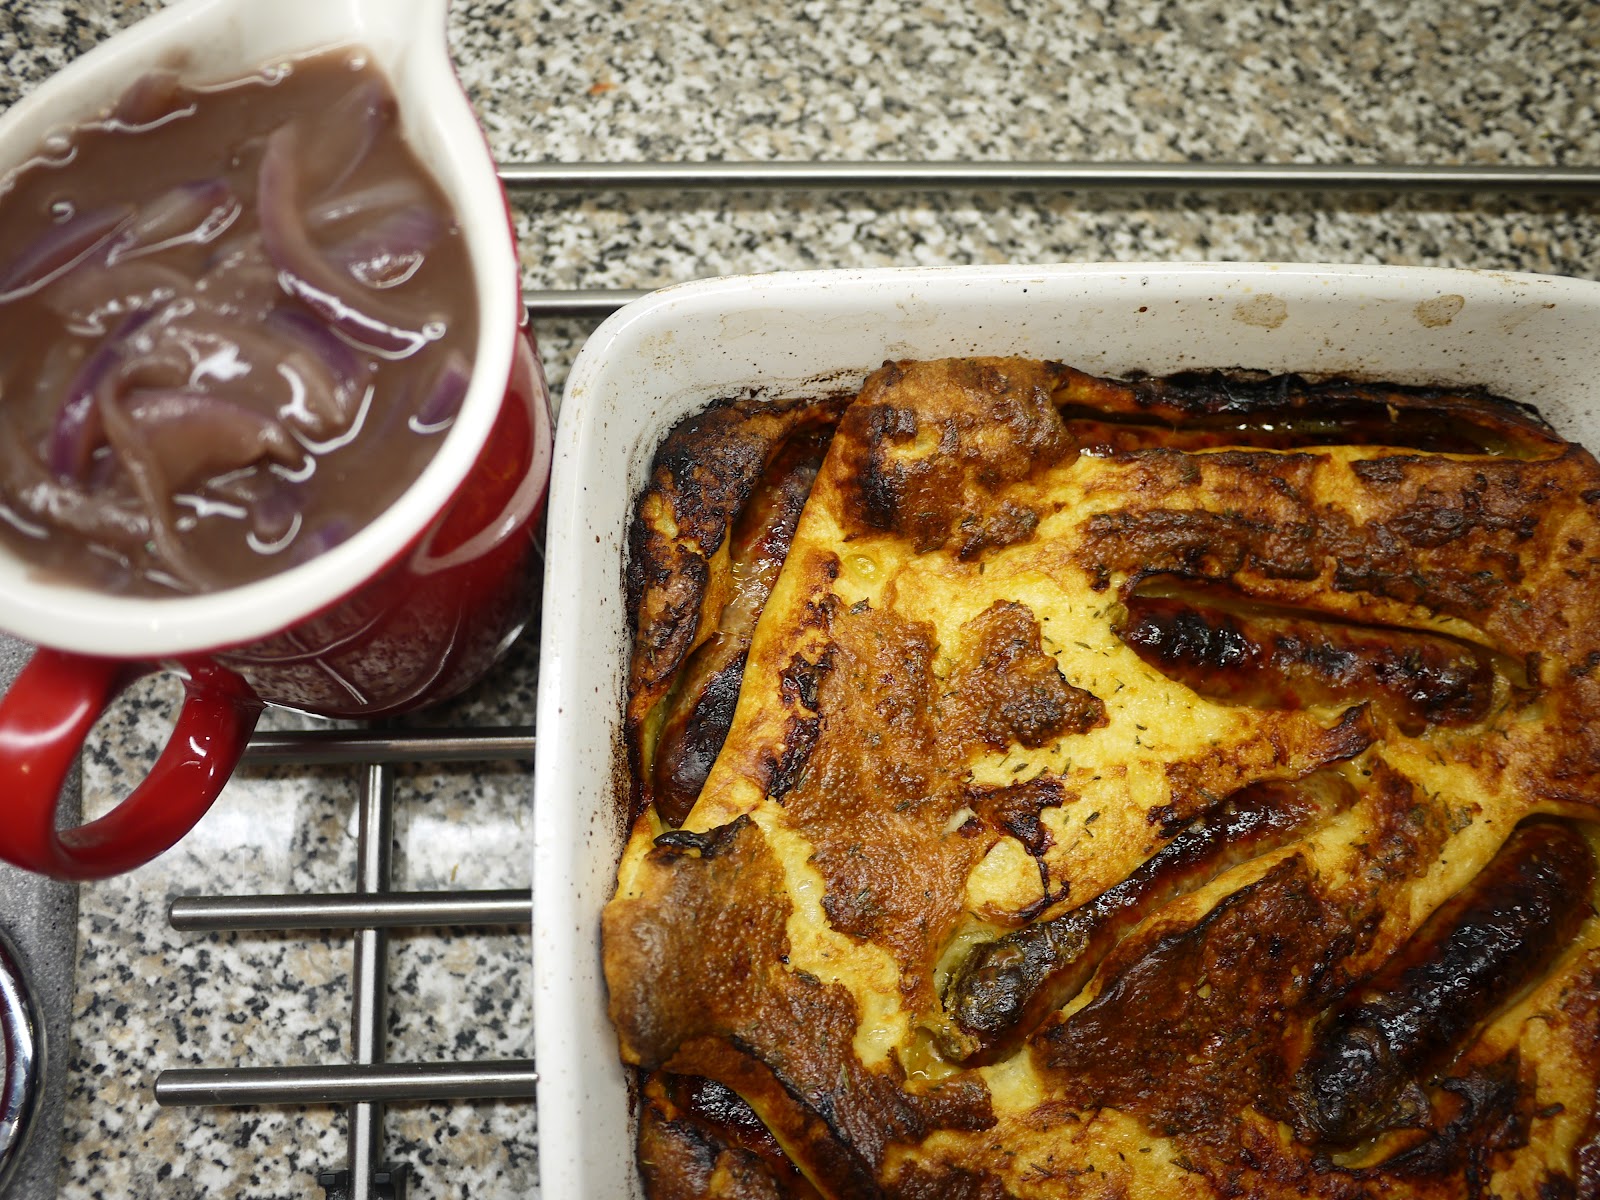
Toad In The Hole With Onion Gravy

'Have you ever had Toad In The Hole' i asked Rachel.

No was the reply... I was flabbergasted, how could someone not have had the joy of eating such a great classic British dish?

Thinking about it though i guess it isn't that fashionable at the moment and hasn't been for a while, you don't see it in any restaurants or even on many pub menus anymore, such a shame. 

And as Rachel has only been on these shores for half of her life she can perhaps be excused for not sampling it, it's obviously not that popular in Ireland, must be something to do with the lack of potatoes...

I've made it more patriotic, and a lovely yellowy colour, by adding a good dollop of English Mustard to the batter mix!


Ingredients -

8 Sausages (i used spicy beef)
100g plain flour
Tsp English mustard
1 egg
Pinch salt and pepper
300ml semi skimmed milk
Tsp thyme
Olive oil

For the gravy -

400ml beef stock
2 red onions, sliced
100ml red wine
A good shake of Worcestershire sauce
Tsp soft brown sugar
   
  • Heat the oven to 200/220C fan/not fan
  • Add a tbsp of olive oil to a 30 x 20cm roasting tin, add the sausages and mix around to make sure they're evenly coated. Bake in the oven for 15 minutes
  • Meanwhile make the batter, sieve the flour into a large bowl and add a little salt and pepper,
  • Make a well in the middle and break in the egg, add a little milk and the mustard and then stir combining a little flour with the wet mixture, keep adding a little more milk and combining in the rest of the flour until you're left with a smooth creamy batter.
  • Take the hot roasting tin out of the oven and pour the batter evenly around, it'll bubble with the fat from the sausages
  • Bake in the oven for 40 minutes until the batter has risen and is crispy. poke a knife into the middle it should be set, not sticky or runny.
 While the toad in the hole is baking make the gravy -
  • Slowly cook the sliced onions in a little olive oil until soft, approx 15 minutes
  • Sprinkle over the sugar and mix, cook for another 5 minutes
  • Sprinkle over the flour and mix well
  • Add the red wine and turn up the heat
  • Add the stock and Worcestershire sauce and bring to the boil, simmer until thickened. 
Serves 4 with veg (something green like broccoli)

Tuesday, 27 March 2012

Szechuan Pig Cheeks


Forget sweet and sour, black bean and chow mein, the only Chinese food that i ever crave is the cuisine from the Szechuan region.

Rachel and I spent 5 days in Chengdu in 2010 and fell in love with the food, there was one street restaurant that we went back to daily having failed to find anywhere that came close for flavour and sheer addictive spiciness.

Upon arriving back in old blighty we were again craving the seriously hot, full of flavour dishes we'd tried a few months before so i trawled the internet for ideas and luckily was provided with a Szechuan cook book, Sichuan Cookery by Fuchsia Dunlop, for my birthday.

And so i discovered the secret - Chilli Bean Paste. My cupboard will never again be missing this vital ingredient.

There are a few ingredients that you may not have seen before but should be easy to find in your local Asian supermarket and you'll be able to pick up pig cheeks from your butchers or Waitrose.

Ingredients -

Tbsp ground nut oil
650g pig cheeks
2 tsp Szechuan Peppercorns, crushed
2 tbsp Shaoxing Wine
2 Red Pepper and 1 Yellow Pepper, sliced
4 tbsp Chilli Bean Paste
3 tbsp Dark Soy Sauce
12 dried red chilis (optional)

For the Stock -
1 litre of Chicken Stock
4 Spring Onions finely chopped
4cm piece of fresh Ginger, finely grated

To serve -
Rice
Stir fried Pak Choi
3 Spring Onions, finely sliced
2 Red Chillis, finely chopped

  • Halve the pig cheeks and place in a bowl with the crushed Szechuan peppercorns and a tbsp Shaoxing wine, mix together and allow to marinate for a few hours, or however long you can.
  • Make a simple Asian stock by adding the finely chopped spring onions and grated ginger to chicken stock and giving a good stir.
  • Heat the oil in a large pan, medium heat, and add the marinated pig cheeks to brown all over, a few minutes on either side. When done remove from the pan and set aside.
  • Add the chilli bean paste to the same pan and stir fry for a few seconds to start releasing all the wonderful flavour. Add the stock, the last tbsp of Shaoxing wine and the soy sauce.
  • Bring to the boil, add the pig cheeks back in and reduce the heat to simmer. 
  • Preheat the oven to 150C
  • Cover the pan with a lid and transfer to the oven for approximately 3 hours or until the meat is really tender. 
  • Add the sliced peppers and dried chillis for the last hour of cooking time.
 Serve over rice with fresh chilli and spring onions sprinkled over the top.